11 days. 7 states. 6 motel rooms and one timeshare for 4 nights.
We have talked about taking this trip for years. A year ago,
we decided to make it happen. New
England wearing it’s fall foliage sounded wonderful. I can honestly say we absolutely made a great
choice.
The interesting thing about the foliage was that each area
had a distinct color, some having more golds and oranges, and as we went down
into Rhode Island, they turned to a rust and dark red. When the light shown
through the leaves, everything absolutely glowed! I also saw so many varieties
of fir and pine trees—most of which I had only seen in the fake Christmas tree
section of Hobby Lobby. People seemed
intrigued as to why we were there. They asked, “so what brought you up here?”
right after hearing my accent and asking where we were from. We just answered, “We’ve
never been here before.” Seems legit, right?
We flew into Buffalo NY on Wednesday and drove to Niagara
Falls, NY where we spent the night. Thursday morning we drove across the US
border to Canada and parked near the falls. It was a cloudy day, so the photos
are a little dark, but this place is incredible—so much power in those falls!
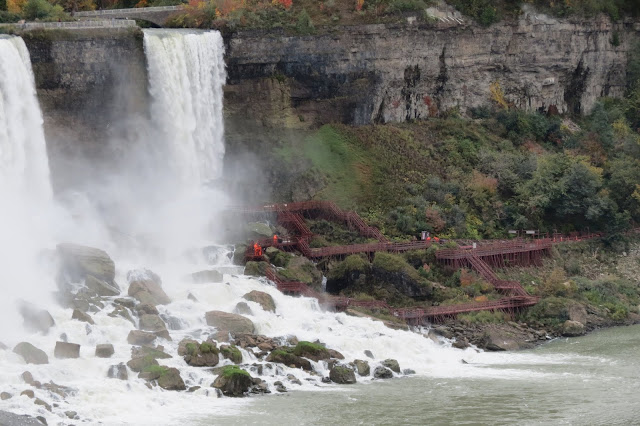
The photo of the boats riding into the mist at the base of Horseshoe Falls in photo #4 gave
me goosebumps—that is not really anything I’d be interested in, thank you! Nor
would I hike down to the water like those fools in the red raincoats in photo #3 over on
the US side—you can get right to the edge of the falls. There was a mist hanging in the air from the
crashing water, I suspect that area is never dry. I recommend this as a must
see!


We left there and started our drive across upstate New York.
We would map our daily route to stay off toll roads and main highways as much
as possible, so we went through mostly smaller towns throughout the whole trip.
I have to say this area was a big surprise-neither of us had anticipated how
beautiful the Finger Lakes region was! The trees still had colorful foliage,
and the little towns were quaint. There were small farms and dairies scattered
along the way. We stopped at a little pub in the mountains and met some folks
who vividly described life with the average 3-4 feet of snow that usually
stayed the entire winter. We spent the
night in Utica, NY, and ate at Nail Creek Pub and Brewery, were we tried the
first of a long week of local brews. You see, that area is known for their IPA
beers (India Pale Ales, which are very hoppy and tart) which are neither Chuck or my favorites. An average beer list would have
5 or 6 IPA’s, but we managed to find a few wheat lagers, ambers, and witbier.
Friday we travelled across the Adirondack Mountains. The leaf color was incredible-I had anticipated that much of the color would be gone in the Northern areas. Most days of our whole trip were overcast, making the vibrant colors of the leaves muddy in the photos, but they were still beautiful! We made a pit stop in Shelburne VT at Fiddlehead Brewing Co, and enjoyed visiting with the folks there. We drove into Burlington VT that night, where we ate at the Farmhouse Tap and Grill.
We started South Saturday along the Western Vermont border.
Today we were on the hunt for covered bridges. It is said that Vermont holds the most covered bridges of any state in the US. We found the three pictured
here that day, and scores more that we did not stop to photograph as the week
went on. We ended our day in Brattleboro
VT at a restaurant that is actually in both Vermont and New
Hampshire, Whetstone Station Brewery and Restaurant.
HOLMES COVERED BRIDGE, CHARLOTTE, VT
PULP MILL BRIDGE, MIDDLEBURY VT
HAMMOND COVERED BRIDGE, PITTSFORD VT
Sunday we woke to light rain. We drove up to our timeshare
in Lincoln, NH along the Western border of Vermont and the Connecticut River. Lincoln
is in the mountains, and for the most part the leaves had all fallen here. We
were able to check in early and proceeded to find the brew house in town to eat
lunch and try a local brew, Black Mountain Burger Company. (We finally found a
locally brewed hefeweizen beer! Yay!) We later moved to One Love Brewery and tried some of their beer, but we were back to mostly IPA's. We would stay here 4 nights.


Monday was our Maine day. As we dropped out of the
mountains, the color returned to the trees. We headed East, allowing Google
Maps to find us a route, and she did not disappoint. You see this trip was a
year of study and planning, mixed with some “turn here, let’s see where this
road goes”. We were told the Kancamagus Highway was one not to miss, and Google
did us one better- we ended up on a narrow lane road along the other side of
the river from the highway that wound through the trees, allowing for an
awesome drive with almost no traffic, and a covered bridge! We made our way into Portland and enjoyed lunch
at DiMillo’s On The Water--lobster roll and bacon wrapped scallops with a maple
syrup glaze. We made our way down to one of their small lighthouses for a
photo. Our way back to Lincoln NH we took a different route, through some very
interesting towns- a couple of them had a main street with HUGE Colonial/Victorian
style homes on it, and most of them were well preserved and just gorgeous! One
town had block after block of brownstones, the likes of which I have only seen
in movies. Another little town had rows of the very traditional Colonial
two-story homes in a historic district. Unfortunately, traffic moved us along
too quickly for me to get photos of these. The road back through the mountains
went by one after another pond, with small cabins surrounding it.


Tuesday we went on the hunt for local cheese. We drove to Landaff Creamery in Landaff NH. It was a small cow farm and creamery and we bought a wedge of fresh cheese. Then we ventured up
to Bethlehem, NH to Meadowstone Farm. They are a family farm that grows a large
variety of organic vegetables and had both cows and goats for the cheesemaking. They both took the cheesemaking process from start to finish! On this trip we discovered Lincoln’s dreary
cloud cover seemed to just hang over the mountains—we went from full sun back
up under that cloud cap to rain and mist. We changed gears from breweries and
headed to a winery in Lincoln. We did a tasting at Seven Birches winery, and snagged
a bottle to have with the cheese we had gotten earlier.
SEVEN BIRCHES WINERY
Wednesday we made a trip back South to Squam Lake, which is
the lake where they filmed “On Golden Pond”. There was a little market there where
we got local goat cheese and some crackers to enjoy with our wine that we had
gotten the day before. We rambled North thorough more gorgeous scenery with
many lakes and ponds before looping back down to Lincoln.

Thursday we headed to Rhode Island. It was a dreary drive,
and we truly didn’t see anything on our drive across Massachusetts as is was
just pouring rain. I give you our view of Massachusetts--
Well, you can't win them all. It was not raining much
in Newport, but the wind was howling! We felt right at home, except the temp
was mid-50’s and very humid! We went to
dinner at a great restaurant that night to enjoy our last seafood on the coast.
I’m sorry there is no before photo, but it’s because I got so excited when it landed
in front of me, I just dove right in! This lobster tail was huge! As you can
see, it was almost as long as my plate! It was stuffed with 2 scallops and one
large shrimp and a delicious stuffing. I was hearing angels sing as I ate!

Friday we took Highway 1 for a while, and stopped for some
photos of the coastline and a marina. The sunshine was welcomed after so many
cloudy days. There was still lots of foliage color here, much darker reds and
rusts. We made our way into Hartford, Connecticut. We grabbed a bite to eat,
returned our rental car, and went to the hotel and hit the sack so we could fly
out early Saturday.
We were surprised by how much agriculture there was
scattered across the area, mostly small farms and dairies. We saw some apple
farms, plenty of hay, and a few corn fields. There was also an abundance of
solar energy farms, and we saw the occasional wind turbine. We drove by several
logging areas and sawmills. Maple syrup and maple products were everywhere. In Maine
we saw several berry stands, all closed for the season. In Massachusetts we missed cranberry harvest
by a few weeks.
We both agreed that we were very blessed to be able to take such
a trip, and that we would not change a thing. I have a huge shout out to Chuck for driving! While there were there
after many places had closed for the winter, we were also there after the
hoards of “leaf peepers” were gone. There was no traffic to fight, no waiting
lines at the restaurants, and still miles and miles of gorgeous leaves. We also
both agreed that with all the beautiful lakes and ponds, perhaps a return in
the summer months might be required….you know, to compare…..
Peace, friends.


